Showing posts with label fabfrocks at home. Show all posts

Monday, 14 July 2014

Fabfrocks at Home: Top Tips For First Time Buying

Hi guys,
It's now been 12 months since we moved into our new house; the first one we have ever owned! To celebrate, I thought I would share some top tips for first time buyers. Not from an expert, you understand, but things that we have gleaned from the whole process!
 photo newhouse1_zpsfaed15df.jpg
1. Know what you want before you start looking. In Norwich, a lot of the older houses have downstairs bathrooms rather than upstairs bathrooms, for example. Having an upstairs bathroom was a deal breaker for us, so we didnt even look at houses without one. I love those old houses, but I knew no amount of original features would make up for having to carry Wilbur downstairs every night when he's learning to potty train!

2. When things go wrong, take a couple of days to dwell on it, pick yourself up and start again. The offer we put in on our dream house (which was at the very top of our budget) was rejected: the house ended up selling for much more than we could have afforded. We sulked for a day or two, picked ourselves up and started the hunt again. The very next house we saw was our house. It felt like home the minute we walked in the door, and now we can't imagine living anywhere else!

3. Once you've found the house you want and your offer has been accepted, make sure you choose a solicitor you're happy with: sometimes it can be tempting to just choose the one that gives you the cheapest quote, but that isn't always the best way. We were really happy with ours, because they took the time to talk us through every step of the, frankly confusing, process. It is nice to know that if you do choose a bad one though you have some recourse: Professional negligence claims against solicitors (a service offered by Redress Law) are always an option if you get a bad or neglectful service, although of course that would add to the stress of the already complicated house buying process so try and choose right in the first place!
 photo newhouse7_zpsd2f6038e.jpg
4. Do as much work as you possibly can before you move your furniture in. It will make the process so much easier, and those days after you get your keys are likely to be when your motivation is at your highest. In the three days after we got our keys and before the furniture van arrived we managed to paint and paper all three bedrooms. Around a month later I painted the bathroom. Twelve months on and we're still yet to paint any of the downstairs rooms, despite the fact the paint has been in the cupboard for a full year! I really wish we'd taken a couple more furniture-free days and just got it done!!

5. Finally, take loads of photos on the day you move in. When it feels like you're not making any progress (something I feel all the time, when Wilbur is making it impossible to strip those doors or wanting to ride me like a horse when I'm bent down to fill in the skirting boards) you can look back at those photos and instantly see how far you've come!

Anyone who's been through the process of buying there first home, or currently going through the process now: do you have any tips and hints to add?

Love Tor x

Tuesday, 8 July 2014

Fabfrocks at Home: How does your garden grow?

Hi guys,
Gardening is one of my least favourite house hold chores. I don't find digging up weeds or mowing the lawn therapeutic: I find it damn hard work! But I also think that if you buy a house with a garden then you should make the most of it, and in order to spend time enjoying your garden you have to do all the hard work first! Sigh. I've spend the better part of the past two days in my garden having a tidy up. Here are some snap shots, as well as some gardening tips for lazy girls:
 photo garden1_zps14eec687.png
- Be sure to check out your local pound shops if you're on a budget.  (Wilbur chose the little froggy in my hydrangeas for just £1 from poundland). I've found some very pretty garden stakes and trellis in mine: much cheaper than heading to the local garden centre, and ideal if you just want to tidy up without spending a fortune.
 photo garden2_zpsf708e969.png
-If you hate weeding that garden in pots. I grow all my flowers, plants and herbs in pots or baskets and it makes them much easier to tend to. It also means I can mow the lawn quickly/vigorously without worrying about clipping my flowers or destroying low level flower beds. This is also a hangover from my renting days, as when you're renting you don't want to do someone else's garden for free: you can just pick up your pots and move out!
 photo garden3_zpsb85aad2f.png
-Cuprinol garden shades is the best thing to ever happen to gardens! Outdoor wood paints in wonderful vibrant colours can really help to dress up your outdoor space. If you have old wooden garden furniture you can make it look like new. We used it to give new life to our garage side door (which was structurally sound but covered in disgusting peeling brown paint) and we also used it to paint a couple of bird boxes to tie the blue colour in.
 photo garden4_zpsb4586cd4.png
- This is a tip that's only relevant for mummies, but if you have little ones then have a separate kids zone. In our garden the lawn is Wilbur's and is covered in a wide array of slides, swings, see-saws, ball ponds and other various toddler paraphernalia. The patio is all mine, apart from Wilbur's miniature table and chairs where he sits to do his jigsaw puzzles in the sun. It's nice to have your own little corner to relax in!

Have you been spending any of this week's sunny days in your garden? Do you have any gardening tips to add?

Love Tor x

Friday, 21 February 2014

Update your interiors for Spring with Magpie

Hi guys,
I'm having a real interior design binge at the moment: Apartment Therapy is like crack to me! We bought our new house last May (so very nearly a year ago) and have done loads of renovating/decorating upstairs. But the big job that is the downstairs of our house has remained pretty much untouched: until now! Whilst spending one of many hours online window shopping for the details we'll put in when the real work is finally done, I stumbled across Magpie. Magpie is a British based ceramics company: they also create coordinating soft furnishings. There pieces tap into my personal taste so perfectly I wondered for a moment if there was some special mind voodoo going on!
 photo magpie1_zps191192f1.png
 photo magpie3_zps53fe2d25.jpg
 photo magpie2_zps40f606d9.jpg
I can imagine these pieces sitting on the 1950s Mid-Century dining table we bought last year (that still needs sanding and varnishing, but of course in my daydream it looks perfect!) To say the pieces are such great quality and such lovely designs, I was surprised by how reasonable the price-points are. 'Chirpy', the bird collection, is my favourite one: I love the rich colours and the mid century feel will match the theme of my open plan living room/dining room perfectly. The price point for this range is £8.50 for a mug, £20 for a set of four side plates, and £22.50 for a 4 serving espresso set. See what I mean? Really reasonable prices!

Looking what I'm going to put on it when it's finished has given me the inspiration I need to get out into the garden and finally get that dining table sanded down! Do you get newly motivated to update your house at this time of year? I suppose they call it 'Spring Cleaning' for a reason!

Love Tor x

Wednesday, 8 January 2014

2014 Trends From Achica: My New Obsession

Hi guys,
One of my main resolutions for 2014 (certainly my main shopping resolution) is to finally get to work on our house. We have so much decoration and renovation to do, and I have a vision for how I want the place to look: we're just not there yet!

We've christened 2014 the year of the house. And so all of my shopping focus is on shopping for things I need to get the place kitted out and looking perfect. That's why Achica is my newest obsession: it's like BrandAlley, but for incredible home furnishings! They sent me over their 2014 trend report this week, and I genuinely went weak at the knees with excitement. If my house could look like their catalogue then I would be one very happy bunny:
 photo achica1_zpsd249d0df.png
 photo achica2_zpse1fd7e4e.png
The geometric-style light fitting is on my immediate hunt and find list! I've bought an incredible chandelier for above my dining table, but don't want to get an electrician in to fit it until I have one for the living room too, so it's a matter of urgency. I also love the pastel room, and am going to use that picture as the basis for my office decoration!

So far, the only rooms we've completed are our bedroom (which we've done in various shades of grey with a vaguely Parisian feel) and Wilbur's nursery (which has a full-blown circus theme). My next project is the bathroom, which we are decking out in a water coloured blue and accessorising with Cath Kidston's rubber duck print. Then it's time to tackle the living room - gulp! We have Sanderson's dandelion clocks wallpaper for the feature wall and then need to get to work with the sander on all the fixtures and fittings. It's going to be the mother of all jobs, but we're looking forward to getting stuck in!

Do you have any interiors resolutions for 2014? And are you using the new year as an excuse to have a proper spring clean? Or are your resolutions far more fashion than home based? I'd love to hear all about them!

Love Tor x

Wednesday, 15 May 2013

Home: Our house. In the middle of our street.

Hi guys,
Lots of people have asked if we're in our new house yet (I know I've done nothing but talk about it for a month). And the answer is yes! We moved in last week, and we've already unpacked most of the boxes, and started decorating and making our mark on the place.

Here's a quick shot of the palace I'll now be calling home, and our very first meal in the new living room. Enjoyed from Tupperware tubs and eaten whilst sat on the baby's play mat, but it still counts!
 photo newhouse1_zpsfaed15df.jpg  photo newhouse5_zpsf80069f9.jpg
The last week has been a whirl of boxes, phone calls to utility companies, and furniture deliveries: hence my radio silence for much of last week. Our internet wasn't reconnected until last Thursday. But now normal blogging service has resumed, and I'm back with a vengeance!

I've posted lots more 'before' pictures of the house over on the Fabfrocks at Home blog. And I'll be updating it regularly with our DIY/Home decorating and shopping progress. So if you want to follow our journey, that's where to go!

Love Tor x

Tuesday, 16 April 2013

Shopping for a new home. Not long to go...

Hi guys,
I've mentioned it a couple of times, but now it's nearly official. We've exchanged contracts, paid the deposit, and in 14 days we pick up the key and officially become homeowners. So what have I done to celebrate? I've gone shopping, of course! Here are just some of the things I've picked up so far:  photo homesofar_zps8cf20efe.png So far I've bought new bedding and new lamps for our bedroom. A new mirror and vases for the living room. A toilet roll holder and shelving unit for the bathroom (I'm all glamour!) Mugs and my dream cutlery chandelier for the kitchen. And this is just the tip of the iceberg of all the new things we need.

As well as all the fun stuff like ordering wallpaper samples, buying new furniture and browsing through endless interiors blogs (I'm addicted to ApartmentTherapy) I've also had to start thinking like a proper grown up very quickly. Checking out home insurance comparison websites, buying life insurance, and even writing our wills. Scary! But I think it's important to protect yourself by having home insurance, and protect the people you love by having life insurance. Especially now we have little man to think about!

Right now though, I just can't wait to get those keys and move in. And of course I'll be showing you all the 'before' pictures as soon as I do!

Love Tor x

* This is a sponsored post

Tuesday, 22 January 2013

Expanding the Fabfrocks empire

Hi guys,
When I started this blog back in 2007, it was to explore all things fashion because that was my obsession. I lived and breathed fashion: I still do. But as I've got older my interests have broadened and changed too. I've gotten married, am about to buy my first house, started experimenting with crafts. I've become a mummy, and realise every day that my little boy is the most important thing in the world: yes, even more important than designer shoes.

So to reflect my changing interests, I've launched two new blogs which will also fall under the Fabfrocks umbrella; Fabfrocks at Home, and Fabfrocks Family.

Fabfrocks at Home
 photo fabfrocksathome660_zps5869f8a5.jpg
Fabfrocks at Home is a place you can lust after beautiful interiors, explore my house as it changes and evolves, and check out the latest homewares from the highstreet. It's also where I will be sharing recipes, crafting how tos, tutorials for doing up your home on the cheap. If it can help make your home a happier and more beautiful place then you'll find it here!

Fabfrocks Family
 photo fabfrocksfamily660_zps9ab97db2.jpg
Fabfrocks Family is the place I will blog about all things around being a mummy! Great changing bags, cute kids outfits, the sleepless nights, the horrible nappies and cute pictures of babies. You'll find all this plus (hopefully) some occasional practical advice about parenting here!

Fabfrocks World
 photo fabfrocksworld660_zpsc0f3b0ad.jpg
This will remain the same fashion blog you know and (hopefully) love. The focus and content will remain just the same: high street, high end, but always bargain on a budget! They'll also be the usual outfit posts, sneak previews of upcoming highstreet collections, and shopping tips.

I hope you like the new sites as much as I do!
Love Tor x

PS- As always, huge thanks to Carly Watts for the amazing design work. I love all of my new headers!

Saturday, 22 December 2012

Christmas crafty Saturday: Almond snowflake biscuits

Hi guys,
I love getting crafty, and Christmas is the perfect time to exercise my love of all thing craft with a real purpose. So I thought that every Saturday during December I would share one of my seasonal crafts with you guys.

Well, Christmas is almost upon us (just three more sleeps to go!) So I thought that rather than give you guys another sewing project you won't have the time to complete, I would give you my favourite Christmas biscuit recipe. It's my favourite because they taste delicious and it's so so simple to make: even for a not especially proficient baker like me! (I'm not being modest: you can see how unproficient I am by how messy the icing is!)
Photobucket
Ingredients
250g softened butter
150g caster sugar
300g plain flour
3 tbspoons almond extract
250g icing sugar
Icing pens/embellishment for decoration

-These really are so simple to make that there are surprisingly few instructions! First pre-heat your oven to 180oC
-Using a large mixing bowl mix together the butter, caster sugar, and 2 tablespoons of almond oil
-Gradually add the flour until you have a large ball of pastry with a doughy consistency
-Roll out the biscuit pastry and cut out biscuit shapes with a cookie cutter (I used a simple round one)
- Bake for 12-15 minutes, or until the biscuits are starting to turn very lightly brown.
-Leave the biscuits to cool whilst making the icing: mix the icing sugar with the final tablespoon full of almond oil then add water until you have a thick paste consistency.
-Now it's time to decorate! Obviously you can decorate these however you want, but I like this easy to execute snowflake design: I just drew it on using an icing pen.

Mary Berry wouldn't be particularly impressed with my decorating skills, but this plateful of biscuits was so well received that it was munched down by my hubby in just one afternoon! Just three more sleeps to go until Christmas: I hope you all have a wonderful time!

Love Tor

Saturday, 15 December 2012

Christmas crafty Saturday: Make the gift wrap part of the present.

Hi guys,
I love getting crafty, and Christmas is the perfect time to exercise my love of all thing craft with a real purpose. So I thought that every Saturday during December I would share one of my seasonal crafts with you guys.

In case you haven't noticed over previous years, I'm going to let you into a little secret. I really really love Christmas. Like I'm obsessed with Christmas! I love decorating our house, buying special presents for everyone I love, I even like writing Christmas cards - I know! I'm crazy! But another one of the things I love (and something I've gotten from my mum) is wrapping my presents, so that they look amazing and leave people excited to open them.

Over the years I've decorated my presents with personalised keyrings, christmas tree ornaments, and candy canes. I've seen gorgeous presents that have been decorated with lollypops, cookie cutters, and even homemade jewellery. When you add something to the top of the present, however small, the wrapping becomes part of the gift.
Photobucket
This year I'm decorating my presents with candy cane mice: felt mice which I'm made by hand and added candy canes to make their tails. You can find the Martha Stewart tutorial on how to make the mice here: note that I stitched mine together rather than using fabric glue recommended by Martha (who knew she was so lazy?!) and they looked much better for it.
Photobucket
Photobucket
For the wrapping paper I've opted for plain metallics or red: I always think if you're going to embellish then the embellishment shows up so much better against the background of plain paper. I also experimented a little with polka dots for that Cath Kidston feel. Other unusual wrapping paper options are to use brown parcel paper and even newspaper: both guaranteed to make your presents stand out when they're underneath the tree!

How do you wrap your Christmas presents? Do you like to make the wrapping into something special, or do you prefer to spend more time on getting the right gift? I wonder if it's part of being a blogger than means I like literally everything I do (even giving a present) to be something that's aesthetically pleasing!

Love Tor xx

PS - Don't forget to enter my Christmas giveaway: there is a great selection of little prizes to be won!! 

Wednesday, 12 December 2012

Fabfrocks at Home: Stylized Christmas home envy!

Hi guys,
I'm a bit of an interiors obsessive: I love checking out other people's home decor, and am forever drooling over interiors blogs (I like to call it house porn!) And if there's one time it's especially nice to see what creative ideas people have for their homes it's Christmas. It's not just interior blogs jumping on this band wagons either: the big department stores are hopping all over it too!

I love checking out the photo shoots that the big department stores put out to promote their Christmas decorations and interior ranges. It used to be that preparing for Christmas meant putting up a Christmas tree. But now you can buy new Christmas throws and cushions, art work, kitchen utensils and even bedding. (Primark have some great Nordic reindeer-print bedding instore, and it's only £15) And I love it!

Here's some decorating inspiration gleamed from the stores you'll find on every highstreet:

Marks and Spencer
Photobucket
Next 
Photobucket
House of Fraser
Photobucket
How do you decorate your home for Christmas? Do you take interior inspiration from blogs and press images and go abit over the top (guilty as charged!) or do you think these things are going a bit too far?

I'll be showing you how we decorate our house for Christmas later in the month. But in the meantime, I'd love to hear your thoughts!

Love Tor xx

PS - Don't forget to enter my Christmas giveaway: there is a great selection of little prizes to be won!! 

Saturday, 8 December 2012

Christmas crafty Saturday: How to make Christmas stockings

Hi guys,
I love getting crafty, and Christmas is the perfect time to exercise my love of all thing craft with a real purpose. So I thought that every Saturday during December I would share one of my seasonal crafts with you guys.

I like to create my own little presents for people, as well as decorations for the house: this year, for the first time, I tried my hand at making a Christmas stocking. It turned out so well that I'm going to show you how I made it so that, if you're feeling so inclined, you can try your hand at making your own:
Photobucket
I kept this really simple and used just two different cotton fabrics, cut out a felt letter, and then ribbons and buttons for the trim. But obviously the only limit to what you can make is your imagination: use velvet, add flowers, diamante, write your name on it with fabric paint. It really is up to you!

You will need:
2 sheets A4 paper to cut the pattern
1/2 meter patterned fabric
1/2 meter plain coloured fabric
Coordinating cotton
Embellishments (I used felt, ribbon, and buttons)
PhotobucketPhotobucket
1. Cut out a stocking template pattern onto your sheets of A4 paper: this will be the template you use to cut your fabric. I drew and redrew mine by hand until I had the shape I wanted.
2. Cut the template 4 times; twice on each of your fabrics. Remember to turn the template around when doing the back panel of the patterned fabric, so the pattern will still show when the stocking is assembled.
3. Place the fabric with the patttern to the inside and the lining to the outside and then stitch the four pieces of fabric together: I used a simple running stitch. If you want to create this even quicker, you could use a sewing machine. Turn inside out and voila: you have your very own simple-to-sew Christmas stocking!
4. Embellish away to your hearts content! And don't forget that if you want to hang your stocking you'll need to add a ribbon loop to the corner.
Photobucket
PhotobucketObviously this one is entirely for my own satisfaction, as the baby will be far too young to appreciate Christmas or stockings. But he'll only get one first Christmas, and I intend to suck as much joy and fun out of it as possible!

So what do you think? Do you think you'll have a go at making your own? If you do, I would LOVE to see how it turns out; email me a picture!

Love Tor x

PS - Don't forget to enter my Christmas giveaway: there is a great selection of little prizes to be won!! 

Sunday, 2 December 2012

Fabfrocks at Home: All decorated for Christmas!

Hi guys,
I love Christmas. Actually that's an understatement: I LOVE Christmas! So as soon as December 1st rolls around, I want my house decorated immediately. Because of course, why not maximise the amount of time you can spend looking at glittery decorations and twinkly lights, right? True to form, yesterday we built our grotto whilst listening to our specially crafted Christmas playlist. Here's how it looks:
Photobucket
-Nothing on my tree matches! It's a mish-mash of colours and styles: but that's because each bauble is special. My mum started it, buying my sisters and I special Christmas baubles to remember every year starting from when we were born. And now Mike and I pick up ornaments on our travels together: we have one to remind us of our wedding day, our honeymoon, even one that says "Our first Christmas together". I think it's a great tradition and makes putting up the tree even more special.

Photobucket
- I love poinsettias: they're so festive, and cheap too! This one cost me just £2.50 from Asda. It has pride of place in our fireplace, and the great thing is (if I remember to water it!) it will last for the whole of December!

Photobucket
- We picked up the nutcracker in Berlin last December. The 70s-style angel was a gift from my mum: something she and my dad have had since they got married. And it just wouldn't be Christmas without a plate full of candy canes to nibble on every time you walk past it!

Photobucket
-Our non-traditional Christmas wreath. I saw one just like this in a fancy design shop, but it was soo expensive. Luckily, my mum is a craft monster and a genius with a glue gun: she managed to replicate it completely for me. I think it looks amazing!

Photobucket
- This is our first year of having a proper fireplace for Christmas, and I love it! Our stockings are all hung up and ready in anticipation. Mike and I have Mickey and Minnie ones, brought in Florida. The baby has his own which I made myself: tutorial on how to make one to follow next weekend!

Photobucket
- Finally the focal point of any home at Christmas: the dining table. My centrepiece is an advent ring. The sweet cones are from Ikea: it's hard to fill them fast enough when Mike is around! We also have a full Christmas dinner service: you really can't avoid the fact that it's December in this house!

Have you put your Christmas tree up yet? How do you like to decorate for Christmas?

Love Tor x

PS - Don't forget to enter my Christmas giveaway: there is a great selection of little prizes to be won!! 

Friday, 2 November 2012

Fabfrocks at home: The compromise living room

Hi guys,
Well, you've already seen the dressing room and the nursery. Next up on the tour of our new house is the living room. Because the house has a living room and dining room, the room is much smaller than the living/dining combo room we had in the old flat. The affect is that it feels nice and cosy, full of all my favourite things.

I call our living room a compromise room because Mike and I have such different tastes. He likes things minimalist, and is a huge fan of slick black furniture. Me? Well I'm the complete opposite! I like vintage, colour, and clutter! So our living room is an odd combination of both. Here's how it looks:
Photobucket
Photobucket
Photobucket
Photobucket
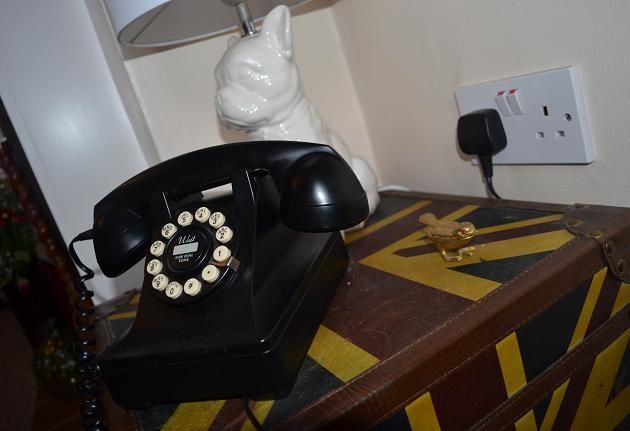
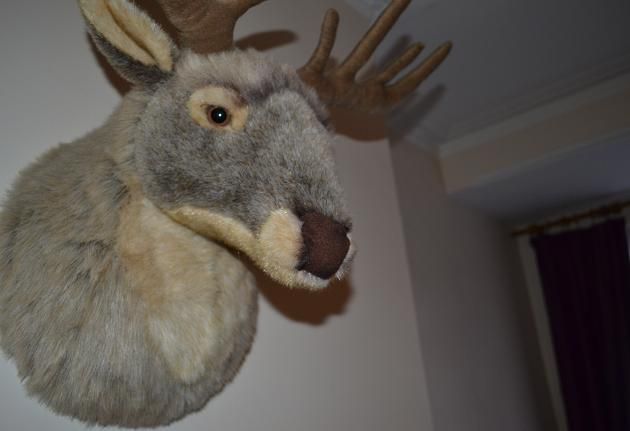
The trunk looks vintage but isn't, it's actually from Homesense. The phone and lamp are both from Debenhams and the little brass bird was a bootsale acquired gift from a friend. We brought the furry stags head back from Berlin (I promise you stuffing this into Mike's rucksack because we were travelling hand-luggage-only was not a highlight of the trip!) The fireguard screen is the newest addition to this room: I got it from a carboot sale for just £1, where it needed some serious work. We scrubbed it clean, replaced the fabric inside the body of the screen and new jewelled knobs for the top (these are just ordinary doorknobs from B&Q, but they serve exactly the same purpose!)

We're renting this place (we're hoping to buy early next year) so we're reluctant to paint or do any extensive refurbishment to the living room: renting and injecting personality is hard! But I do like this room: it's so cozy and just perfect for snuggling up warm in when it's cold outside.

Do you have to compromise in your house? Do you have different tastes from your partner/housemates and how do you make it work?

Love Tor xx

Monday, 22 October 2012

Fabfrocks at Home: How to carve a pumpkin

Hi guys,
Pumpkin carving is something of an annual Halloween tradition in the Fabfrocks household: hubby and I carve a pumpkin each every year, and compete to see who can create the best design! But if you've never carved a pumpkin before it can be quite daunting. Which is why I've written this quick step by step tutorial (complete with pictures) so that you can create a scary Jack-o-lantern of your own!
Photobucket
1. You will need: We don't buy special pumpkin carving kits, we just use the tools we have in the kitchen. We use a sharp knife, a blunt normal eating knife, a spoon, and an ice cream scoop. You will also need a biro to draw your design template.
Photobucket
2. First you need to do your prep work. Take a sharp knife and remove the top of the pumpkin: traditionally this is done in the shape of a simple circle. I like to create a star shaped lid. Once you have removed the lid comes the boring bit: emptying the pumpkin! Remember that the more of the flesh you can remove, the longer your pumpkin will last. I use a spoon and an icecream scoop to remove as much of the flesh as possible.
Photobucket
3. Choose your design. Google images is a great source of inspiration for this! Once you know what you want your pumpkin to look like, take your biro and draw your design onto the front of your pumpkin: this will provide the template that you will cut out.
Photobucket
4. Get cutting! Take the sharp knife and remove the skin and flesh from your design. I then use the blunt knife to smooth the edges as much as possible: I find it much easier to control and stick to the design that way.
Photobucket
5. Insert your candle, light you're pumpkin, and put it in your living room window so that it can frighten all the children on your street....Mwah hah hah!!! It really is that easy!

Have you carved a pumpkin for this Halloween? What design did you go for? I'd love to see your pumpkin pictures!

Love Tor xx

Monday, 24 September 2012

Fabfrocks at Home: The circus-themed nursery

Hi guys,
We have been living in our new house for almost four months, and slowly but surely, it is starting to look like a home I am proud to live in. Last month I showed you the final version of my walk-in wardrobe. This month, we have finally (very nearly!) finished the baby's nursery. So here's the tour:
Photobucket
Photobucket
Photobucket
The shelving unit, cot, and wardrobe are all from good ol' Ikea. We changed the knobs on the wardrobe door to make it look a little more unique. The red double sofa bed was already a spare room feature, but we decided to keep it as a big comfy seat to watch him sleep/play/whatever, and as a spare bed for overnight visitors: we only have a 2 bedroom house, so it's important to maximise space.
Photobucket
Photobucket
The vintage circus posters (which we talked about here) are all from eBay. The cushions on the sofa are from Cath Kidston, Etsy, and Little Joules. Cath Kidston does a vintage circus print fabric that I absolutely fell in love with. So I made some bunting using it, and then enlisted my much craftier mum to make all the other soft furnishings in the room using the fabric: She made the cotton bags hanging from the wardrobe doors, the huge sofa throw, and the quilt on the end of the baby's cot. She even used the circus print fabric to trim his little towels: now that's attention to detail! She's seriously talented and you can visit her website for more incredible nursery creations by clicking here.
Photobucket
Photobucket
The glass balloons hanging in the window are from Murano; the glass island off Venice. We picked them up when we were there last month and my dad made the frame so we could hang them. The giant elephant seat is another Ikea purchase and he already has more bears, books and toys than any little boy needs: and he isn't even born yet! With that and his fancy wardrobe full of clothes, I think it's fair to say we've gone a little over the top.

All we have left to do is buy a light fitting (we're finding it really hard to choose!) and make the curtains. I've bought the fabric: red and white striped, like a big top. I just have to get my sewing machine out, sit down, and actually make them!

Love Tor xx